Hướng dẫn thêm node mới vào RAC đang hoạt động
Đặt vấn đề:
Hiện tại chúng ta đang vận hành RAC 2 node hoặc 1 node, do nhu cầu dự án tăng cao => cần tăng năng lực xử lý của cụm database => add thêm node mới vào RAC hiện tại
Thông tin 2 node hiện tại:
Oracle GI: 19.0
Oracle database: 19.0
Oracle Linux 7.9
cat /etc/hosts
# Public
192.168.24.1 rac1.localdomain rac1
192.168.24.2 rac2.localdomain rac2

# Private
192.168.10.1 rac1-priv.localdomain rac1-priv
192.168.10.2 rac2-priv.localdomain rac2-priv

# Virtual
192.168.24.31 rac1-vip.localdomain rac1-vip
192.168.24.32 rac2-vip.localdomain rac2-vip

# SCAN
192.168.24.41 rac-scan.localdomain rac-scan
192.168.24.42 rac-scan.localdomain rac-scan
192.168.24.43 rac-scan.localdomain rac-scan

# DNS
192.168.24.111 dnsss.localdomain dnsss
Thêm rac3 vào trong tất cả node hiện có trong file etc/hosts:
Sửa/thêm thông tin bên dưới vào RAC1, RAC2, RAC3
vi /etc/hosts
# Public
192.168.24.1 rac1.localdomain rac1
192.168.24.2 rac2.localdomain rac2
192.168.24.3 rac3.localdomain rac3

# Private
192.168.10.1 rac1-priv.localdomain rac1-priv
192.168.10.2 rac2-priv.localdomain rac2-priv
192.168.10.3 rac3-priv.localdomain rac3-priv

# Virtual
192.168.24.31 rac1-vip.localdomain rac1-vip
192.168.24.32 rac2-vip.localdomain rac2-vip
192.168.24.33 rac3-vip.localdomain rac3-vip

# SCAN
192.168.24.41 rac-scan.localdomain rac-scan
192.168.24.42 rac-scan.localdomain rac-scan
192.168.24.43 rac-scan.localdomain rac-scan

# DNS
192.168.24.111 dnsss.localdomain dnsss
Chuẩn bị RAC3:
–đặt hostname
hostnamectl set-hostname rac3.localdomain
–Tắt firewall
systemctl stop firewalld.service
systemctl disable firewalld.service
–Bật đồng bộ thời gian
systemctl enable chronyd.service
systemctl restart chronyd.service
systemctl status chronyd
chronyc tracking
chronyc sources
chronyc -a 'burst 4/4'
chronyc -a makestep
–Cập nhật và cài đặt các gói, update hệ thống, preinstall, oracleasm
yum update -y
yum install -y oracle-database-preinstall-19c.x86_64
yum install -y oracleasm-support
yum install -y oracleasm
yum install –y oracleasmlib
–reboot OS
–Tạo thêm các nhóm cho oracleasm
groupadd asmdba
groupadd asmoper
groupadd asmadmin
–Thêm nhóm bên trên cho user oracle, Ở đây chúng ta tiến hành cài đặt grid bằng user oracle luôn mà ko cần tạo user grid:
usermod -G asmdba,asmoper,asmadmin oracle
–Đặt pass cho user oracle
passwd oracle
–Tạo các đường dẫn cần thiết trên RAC3 để cài đặt Grid, Oracle_home
mkdir -p /u01/app/19c/grid
mkdir -p /u01/app/grid
mkdir -p /u01/app/oracle/product/19c/dbhome_1
—Đổi sang user oracle và tạo biến môi trường bash
su oracle
cd
vi .bash_profile
# Oracle Settings
export TMP=/tmp
export TMPDIR=$TMP
export ORACLE_BASE=/u01/app/oracle
export GRID_HOME=/u01/app/19c/grid
export DB_HOME=$ORACLE_BASE/product/19c/dbhome_1
export ORACLE_HOME=$DB_HOME
export ORACLE_SID=oradb
export ORACLE_TERM=xterm
export BASE_PATH=/usr/sbin:$PATH
export PATH=$ORACLE_HOME/bin:$BASE_PATH
export LD_LIBRARY_PATH=$ORACLE_HOME/lib:/lib:/usr/lib
export CLASSPATH=$ORACLE_HOME/JRE:$ORACLE_HOME/jlib:$ORACLE_HOME/rdbms/jlib
—Tạo biến môi trường cho profile oracle cài grid
vi /home/oracle/grid.env
export ORACLE_SID=+ASM3
export ORACLE_HOME=$GRID_HOME
export PATH=$ORACLE_HOME/bin:$BASE_PATH
export LD_LIBRARY_PATH=$ORACLE_HOME/lib:/lib:/usr/lib
export CLASSPATH=$ORACLE_HOME/JRE:$ORACLE_HOME/jlib:$ORACLE_HOME/rdbms/jlib
–shutdown
–ADD vào máy ảo, Tạo 3 đĩa dùng để lưu trữ dữ liệu cài đặt và setup chế độ sharable => mô phỏng hệ thống SAN, sau đó Add đĩa sharable của rac1 vao rac2 => 3 đĩa này thành đĩa dùng chung lưu trữ database: DATA (datafile), FRA(fast recovery area), OCR (oracle cluster register..)
–dung lượng tương ứng là: 100GB, 300GB, 20GB
–Vtbox/file/tool/Virtual media manager/create disk
–Trong trường hợp này chúng ta đã có RAC sẵn rồi nên add các đĩa ASM có sẵn của RAC hiện tại vào rac3, các ổ đĩa phải được đặt trong chế độ sharable
–Start RAC3
–Kiểm tra kết nối mạng xem thông chưa
ping -c 2 rac1
ping -c 2 rac2
ping -c 2 rac3
ping -c 2 rac1-priv
ping -c 2 rac2-priv
ping -c 2 rac3-priv
–Cài đặt oracleasm
su -
/usr/sbin/oracleasm configure -i
oracle
oinstall
y
y
/usr/sbin/oracleasm status
/usr/sbin/oracleasm init
/usr/sbin/oracleasm status

oracleasm scandisks
oracleasm listdisks
Chuyển Owner cho thư mục cài đặt u01:
chown -R oracle:oinstall /u01
Cấu hình SSH cho oracle user trên các node:
Trên RAC1, Copy sshUserSetup.sh script vào rac3 và thực thi script:
cd /u01/app/19c/grid/deinstall

scp sshUserSetup.sh oracle@rac3:/home/oracle
Login vào RAC3 thực thi ssh:
cd
sh sshUserSetup.sh -hosts "rac3" -user oracle
yes
yes
enter
enter
pass: oracle
pass: oracle
Đồng bộ authorized keys của cả 3 RAC để ssh được tự động:
Vào RAC3 copy authorized_keys sang RAC1
cd
cd .ssh
scp authorized_keys oracle@rac1:/home/oracle/
Vào RAC1: thêm nội dung authorized_keys vừa copy từ rac3 vào cuối file authorized_keys của RAC1 hiện có trong thư mục .SSH hiện tại
su oracle
cd
cat authorized_keys >> .ssh/authorized_keys
RAC1: Mở file lên xem thử nội dung:
cat .ssh/authorized_keys
ssh-rsa AAAAB3NzaC1yc2EAAAADAQABAAAAgQDfhDvo84pp4tWMYDNd0NuubC7fHyOk/56GsyXHzFinnQeLg7Tinqayt15s0ooerYvNVXgRe2TJFV2s3B1TkpQ/6ulZHF8U78VbWxubccko2S5WPpnm8AqT7w4l3uIX74IRPoh3ItlpXQHUZ3CWAQ2KsvPONjy8BuRp0DJdJi49pw== root@rac1.localdomain

ssh-rsa AAAAB3NzaC1yc2EAAAADAQABAAAAgQDfhDvo84pp4tWMYDNd0NuubC7fHyOk/56GsyXHzFinnQeLg7Tinqayt15s0ooerYvNVXgRe2TJFV2s3B1TkpQ/6ulZHF8U78VbWxubccko2S5WPpnm8AqT7w4l3uIX74IRPoh3ItlpXQHUZ3CWAQ2KsvPONjy8BuRp0DJdJi49pw== root@rac1.localdomain

ssh-rsa AAAAB3NzaC1yc2EAAAADAQABAAAAgQDfhDvo84pp4tWMYDNd0NuubC7fHyOk/56GsyXHzFinnQeLg7Tinqayt15s0ooerYvNVXgRe2TJFV2s3B1TkpQ/6ulZHF8U78VbWxubccko2S5WPpnm8AqT7w4l3uIX74IRPoh3ItlpXQHUZ3CWAQ2KsvPONjy8BuRp0DJdJi49pw== root@rac1.localdomain

ssh-rsa AAAAB3NzaC1yc2EAAAADAQABAAABAQCjtsR5QIESkBioyJUBLMIhj11/+nDAIr6iof8qYxlA0mgAfyVq6ZpFo4Nz5LrDpm0s4pgOe7ki09KI7MWXoxspPJ06qUagUsh6x/4Lf4Wegtxe9bZXQaZwaSCqax/1LjR5DWSFFO9WLvEWXfWwVzUnlPwBJK6qr7tnEtZbkQr28tYc+9LcqX1vAiPHkE1HJ7GWRgNwZqAOPcbnd6pNXZRsv/WnI+mzPlxymm2G/SXpH6pxq2x8ClO1xsjeh4QUJb6jyPmOHj0W8rIXgpM1pYEFyMwYkgxV+E5F6zCu1NZW2XxR9AuOQqKX1I15Gsypn8M1K2cPdfxyIFcNO4cTt5uh oracle@rac1.localdomain

ssh-rsa AAAAB3NzaC1yc2EAAAADAQABAAABAQDQaiJJeYs8pBf+JyiTRTv+DsTQha6ZixEvAca7D/ywlDQLDkXMXYXGajad/WF434reD00KDPQbSlHmQc5L3ZvAkIc+K3BOTFmuV8c8W7CazqZLtasnUt8lMcgQA3+vn0WQW3O3yG3uVi7vtrroOFlWMY99RcsJMRyPeJ0xnm9bc6CxrSVoIwhSuMNjMpFMqQn8n6izI+tru/OwVmkc74qHvytZ0LVoBMPWeI5CFy0PH5S4sL+vg1XHo9fcii6pOtRc5G6j97aK5mZ1Zx0D8bQD1+pishEFpu7ALL5oS4XIYJ9XJNDr01JPAHoBy/aDXdB5suqZWGKLGQ9I6dUQF2in oracle@rac2.localdomain

ssh-rsa AAAAB3NzaC1yc2EAAAADAQABAAAAgQDRNr3Lt290+lpnAQz/2RMZGgwP4qktA6ZZjubaJvjkJ69BFfUvcB/JV/fOE2DKh4mteVeZX+w35atpLZpP3FlbNs5NWVyj7dKi/vDA6rMhsAu370iTlpJJkeCwsxPJQTetvgJcNhcxqU/2DrGKor5z0En2Y0aGNBk+XYTEzYVhbw== oracle@rac3.localdomain

ssh-rsa AAAAB3NzaC1yc2EAAAADAQABAAAAgQDRNr3Lt290+lpnAQz/2RMZGgwP4qktA6ZZjubaJvjkJ69BFfUvcB/JV/fOE2DKh4mteVeZX+w35atpLZpP3FlbNs5NWVyj7dKi/vDA6rMhsAu370iTlpJJkeCwsxPJQTetvgJcNhcxqU/2DrGKor5z0En2Y0aGNBk+XYTEzYVhbw== oracle@rac3.localdomain
Từ RAC1 => copy file authorized_keys sang RAC2 và RAC3, đảm bảo nội dung file này trên 3 RAC là giống nhau (nhằm mục đích cấp quyền SSH tự động không cần xác nhận password về sau):
cd .ssh
scp authorized_keys oracle@rac2:/home/oracle/.ssh/
scp authorized_keys oracle@rac3:/home/oracle/.ssh/
Lúc này trên cả 3 RAC đã có file authorized_keys trong thư mục home/oracle/.ssh (file này để xác thực login ssh không cần nhập mật khẩu)
Check Time Synchornization: trên RAC1 thực hiện lệnh check thông tin date như sau
ssh rac1 date
ssh rac2 date
ssh rac3 date
[oracle@rac1 ~]$ ssh rac1 date
Tue Apr 16 10:01:44 +07 2024
[oracle@rac1 ~]$ ssh rac2 date
Tue Apr 16 10:01:51 +07 2024
[oracle@rac1 ~]$ ssh rac3 date
Tue Apr 16 10:02:05 +07 2024
Verify Cluster utility :
RAC1:
cd /u01/app/19c/grid/bin
./cluvfy comp peer -n rac3 -refnode rac1

Verifying Peer Compatibility ...
Verifying Physical memory ...FAILED
Node Name Status Ref. node status Comment
------------ ------------------------ ------------------------ ----------
rac3 5.6425GB (5916580.0KB) 9.4746GB (9934796.0KB) mismatched
Verifying Available memory ...PASSED
Node Name Status Ref. node status Comment
------------ ------------------------ ------------------------ ----------
rac3 4.8871GB (5124536.0KB) 4.5564GB (4777752.0KB) matched
Verifying Swap space ...PASSED
Node Name Status Ref. node status Comment
------------ ------------------------ ------------------------ ----------
rac3 29.293GB (3.07159E7KB) 4.75GB (4980732.0KB) matched
Verifying Free Space ...PASSED
Node Name Path Mount point Status Ref. node status Comment
---------------- ------------ ------------ ------------ ------------ -----------
rac3 /usr / 480.7676GB (5.04121344E8KB) 27.8271GB (2.917888E7K
Pre-check:
RAC1:
$GRID_HOME/bin/cluvfy stage -pre nodeadd -n rac3 -fixup -verbose > /home/oracle/cluvfy_pre_nodeadd.txt
Xem thông tin kết quả lệnh bên trên: RAC1
cd
cat cluvfy_pre_nodeadd.txt
Thêm GRID cho node mới: (đồng bộ soft Grid từ RAC1 sang RAC3)
RAC1: Chạy biến môi trường grid
grid.env
export IGNORE_PREADDNODE_CHECKS=Y
Vào thư mục cài đặt addnode và thực hiện add node: RAC1
cd $GRID_HOME/addnode
./addnode.sh
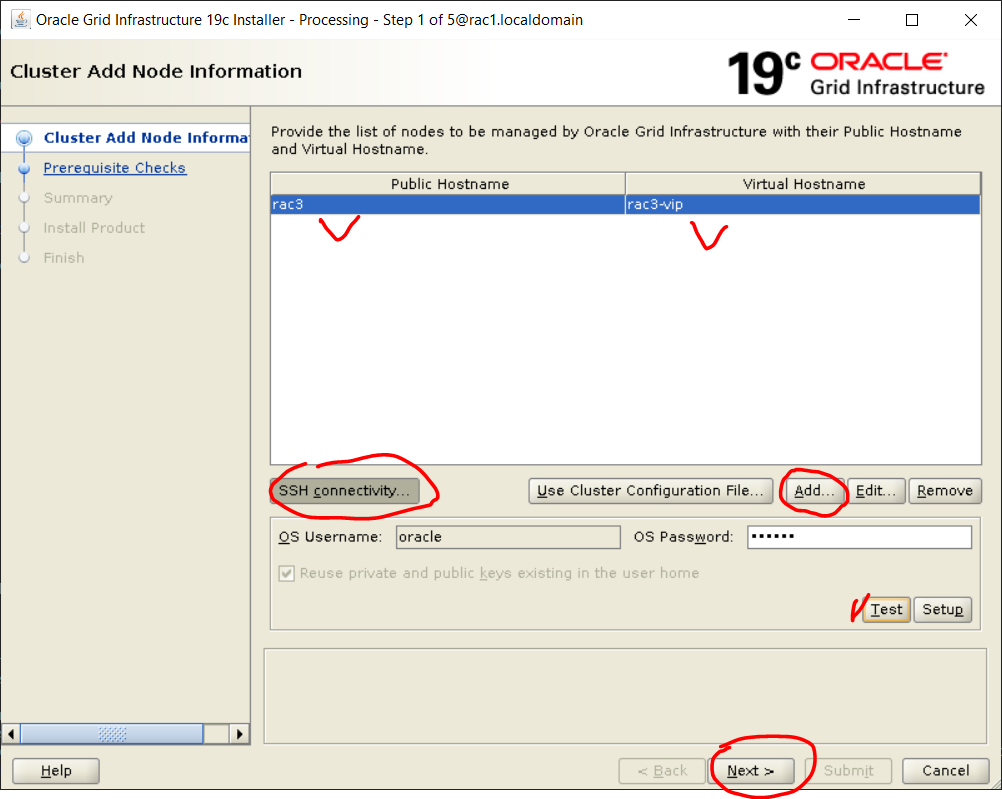
Test SSH nếu cần

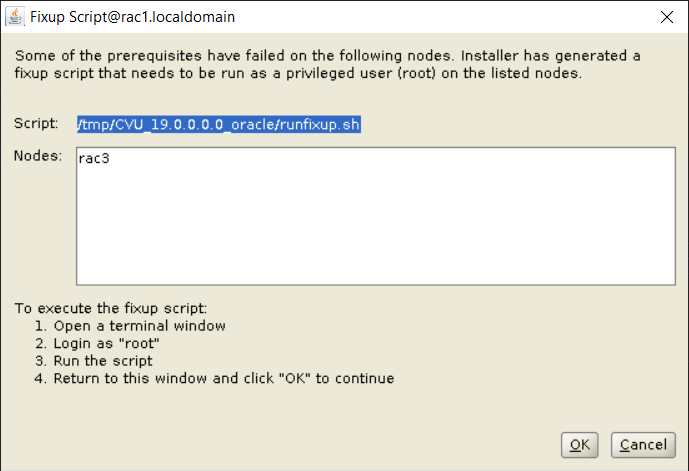
Fixup nếu có lỗi như bên trên, làm theo hướng dẫn trên thông báo
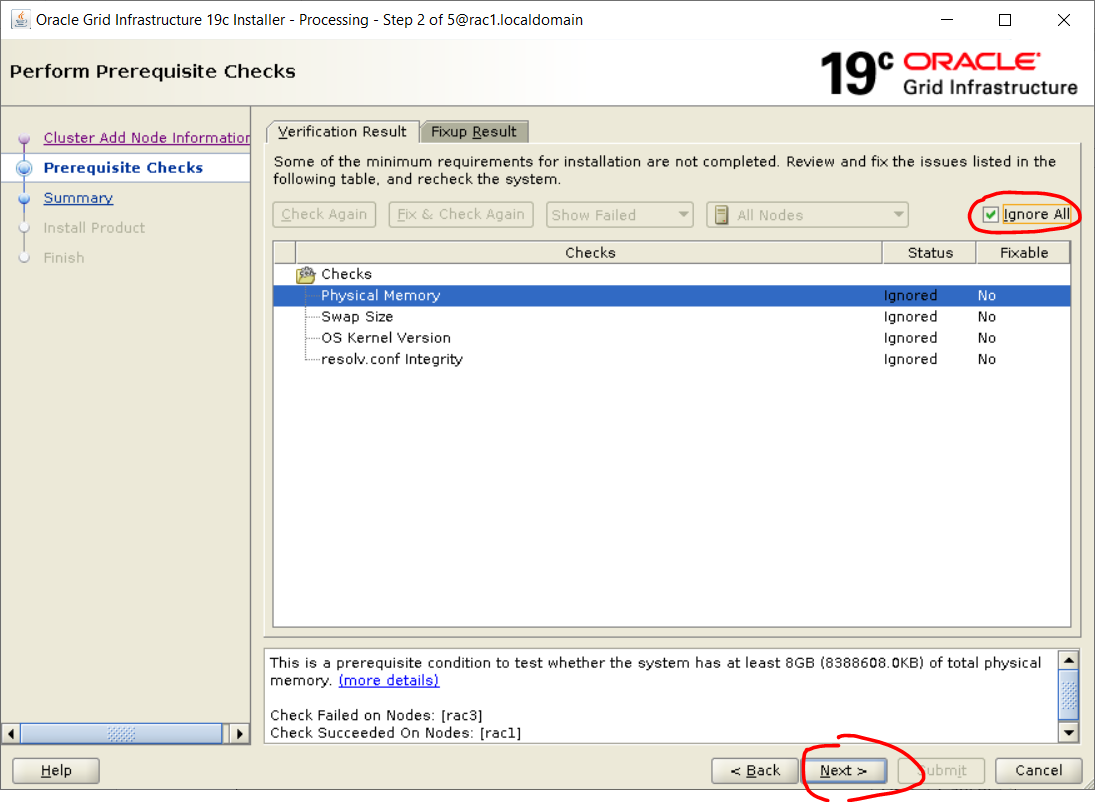

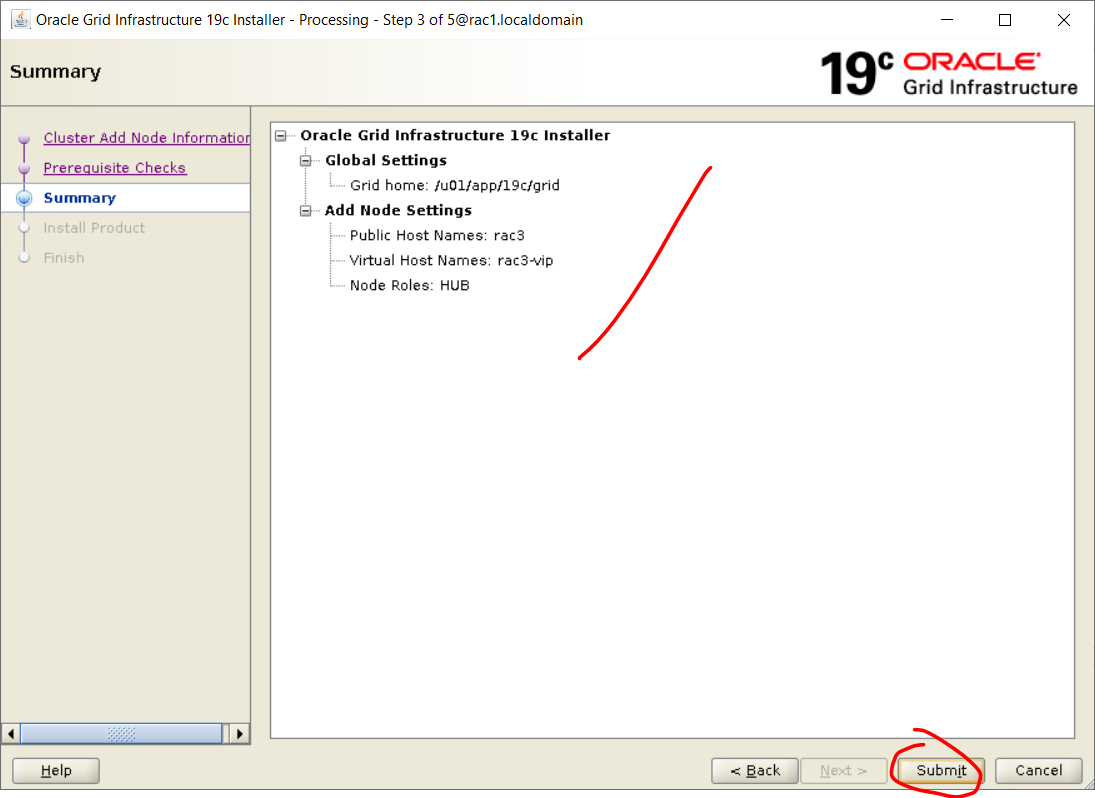
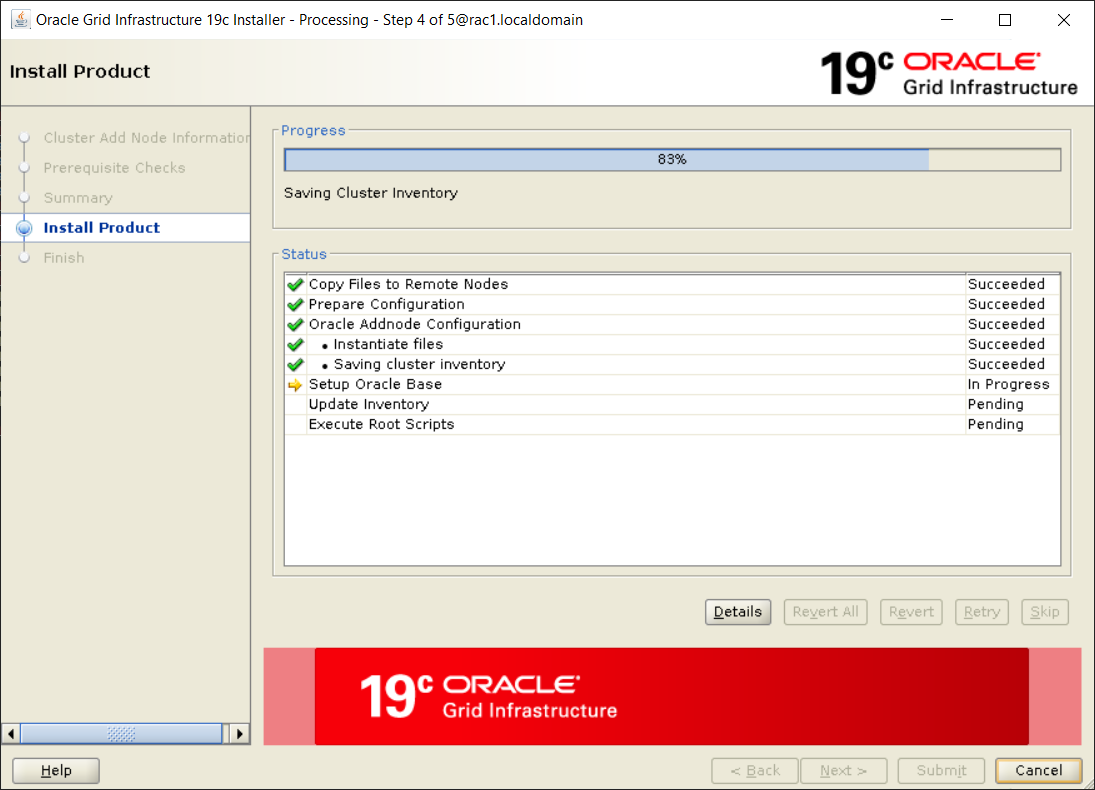
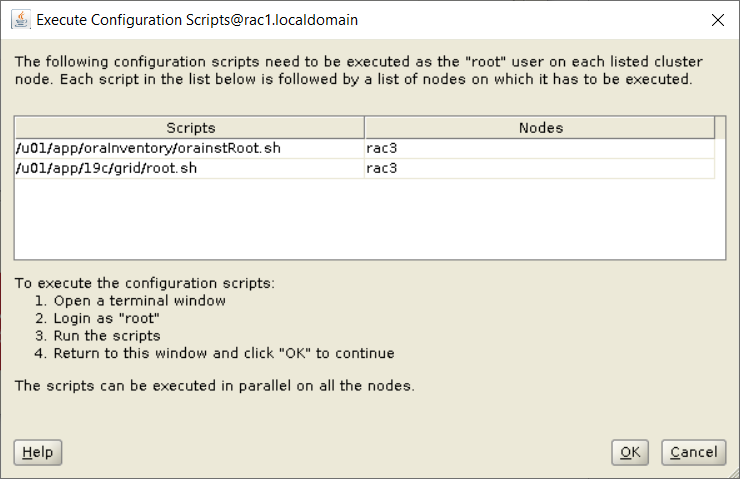
Chạy orainstRoot.sh and root.sh trên rac3
Using configuration parameter file: /u01/app/19c/grid/crs/install/crsconfig_params
The log of current session can be found at:
/u01/app/grid/crsdata/rac3/crsconfig/rootcrs_rac3_2024-04-16_10-43-45AM.log
2024/04/16 10:43:54 CLSRSC-594: Executing installation step 1 of 19: ‘SetupTFA’.
2024/04/16 10:43:54 CLSRSC-594: Executing installation step 2 of 19: ‘ValidateEnv’.
2024/04/16 10:43:54 CLSRSC-363: User ignored prerequisites during installation
2024/04/16 10:43:54 CLSRSC-594: Executing installation step 3 of 19: ‘CheckFirstNode’.
2024/04/16 10:43:55 CLSRSC-594: Executing installation step 4 of 19: ‘GenSiteGUIDs’.
2024/04/16 10:44:02 CLSRSC-594: Executing installation step 5 of 19: ‘SetupOSD’.
2024/04/16 10:44:02 CLSRSC-594: Executing installation step 6 of 19: ‘CheckCRSConfig’.
2024/04/16 10:44:08 CLSRSC-594: Executing installation step 7 of 19: ‘SetupLocalGPNP’.
2024/04/16 10:44:15 CLSRSC-594: Executing installation step 8 of 19: ‘CreateRootCert’.
2024/04/16 10:44:15 CLSRSC-594: Executing installation step 9 of 19: ‘ConfigOLR’.
2024/04/16 10:44:40 CLSRSC-594: Executing installation step 10 of 19: ‘ConfigCHMOS’.
2024/04/16 10:44:41 CLSRSC-594: Executing installation step 11 of 19: ‘CreateOHASD’.
2024/04/16 10:44:46 CLSRSC-594: Executing installation step 12 of 19: ‘ConfigOHASD’.
2024/04/16 10:44:46 CLSRSC-330: Adding Clusterware entries to file ‘oracle-ohasd.service’
2024/04/16 10:44:48 CLSRSC-4002: Successfully installed Oracle Trace File Analyzer (TFA) Collector.
2024/04/16 10:45:15 CLSRSC-594: Executing installation step 13 of 19: ‘InstallAFD’.
2024/04/16 10:45:17 CLSRSC-594: Executing installation step 14 of 19: ‘InstallACFS’.
2024/04/16 10:45:20 CLSRSC-594: Executing installation step 15 of 19: ‘InstallKA’.
2024/04/16 10:45:21 CLSRSC-594: Executing installation step 16 of 19: ‘InitConfig’.
2024/04/16 10:45:36 CLSRSC-594: Executing installation step 17 of 19: ‘StartCluster’.
2024/04/16 10:47:02 CLSRSC-343: Successfully started Oracle Clusterware stack
2024/04/16 10:47:02 CLSRSC-594: Executing installation step 18 of 19: ‘ConfigNode’.
clscfg: EXISTING configuration version 19 detected.
Successfully accumulated necessary OCR keys.
Creating OCR keys for user ‘root’, privgrp ‘root’..
Operation successful.
2024/04/16 10:48:12 CLSRSC-594: Executing installation step 19 of 19: ‘PostConfig’.
2024/04/16 10:48:27 CLSRSC-325: Configure Oracle Grid Infrastructure for a Cluster … succeeded
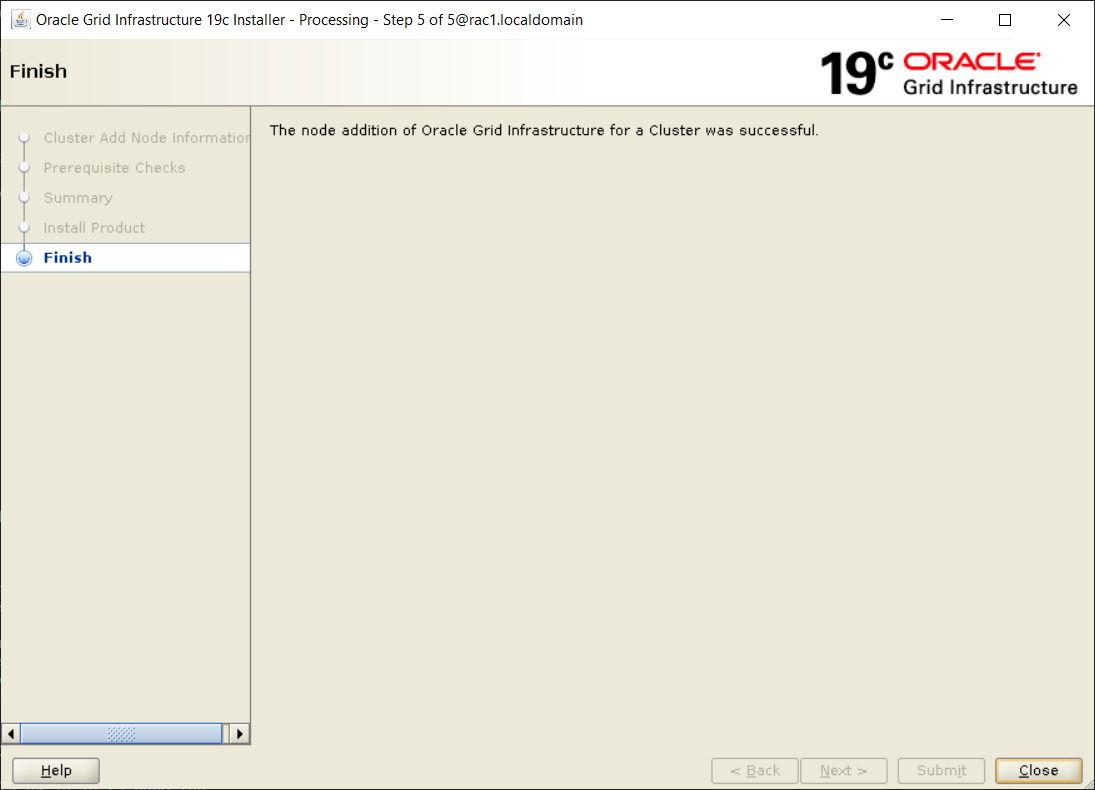
RAC3:
Check trạng thái của cluster, lúc này Cluster đã chạy và cập nhật RAC3
cd $GRID_HOME/bin
./crsctl check cluster -all
./crsctl stat res -t

[oracle@rac1 bin]$ ./crsctl check cluster -all
**************************************************************
rac1:
CRS-4537: Cluster Ready Services is online
CRS-4529: Cluster Synchronization Services is online
CRS-4533: Event Manager is online
**************************************************************
rac2:
CRS-4537: Cluster Ready Services is online
CRS-4529: Cluster Synchronization Services is online
CRS-4533: Event Manager is online
*************************************************************
rac3:
CRS-4537: Cluster Ready Services is online
CRS-4529: Cluster Synchronization Services is online
CRS-4533: Event Manager is online
**************************************************************
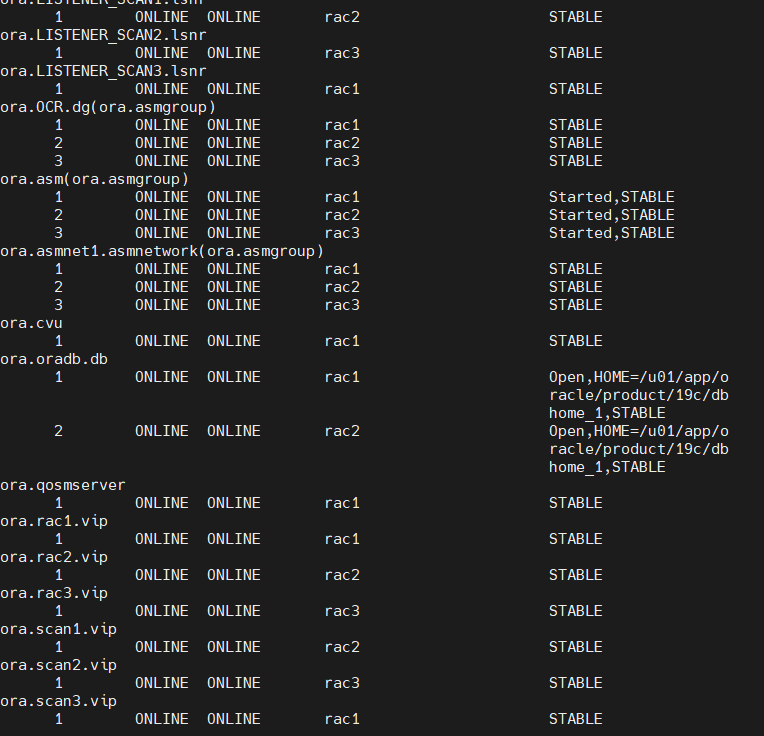
Cài đặt ORACLE_HOME cho node mới RAC3 (đồng bộ từ RAC1 sang)
RAC1: chạy môi trường oracle database và vào trong oracle_home
cd
. .bash_profile
cd $ORACLE_HOME/addnode
./addnode.sh
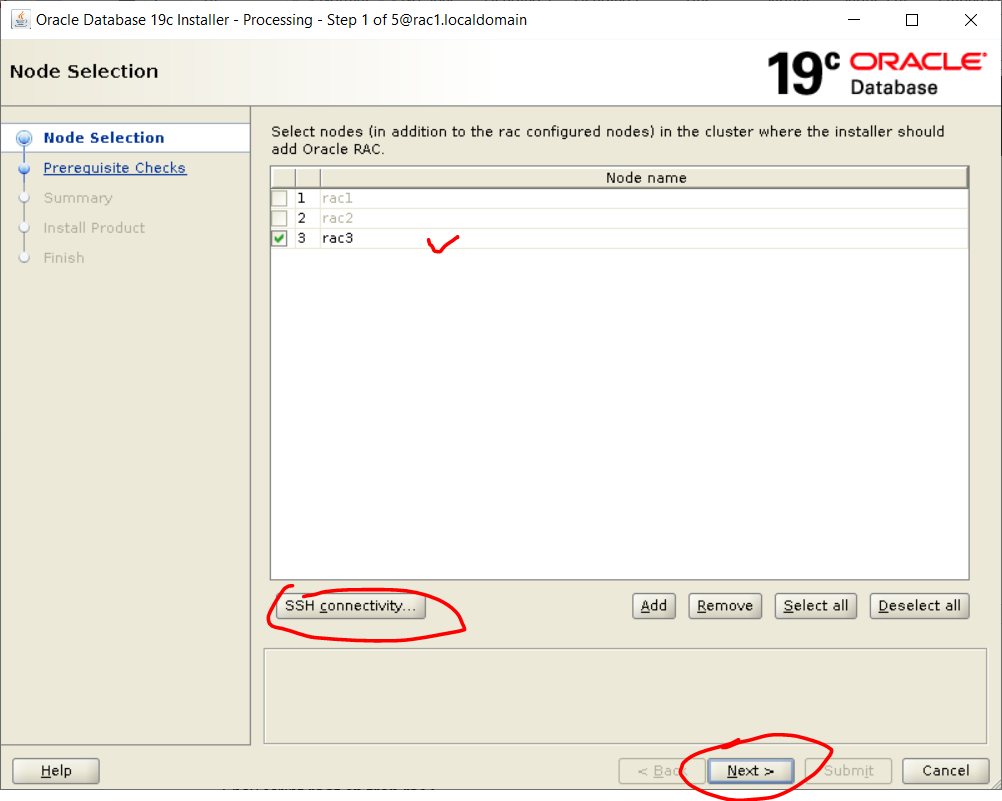
Tiến hành test SSH connectivity để chắc chắn rằng SSH thông hết các node (nếu ko thì có thể next)
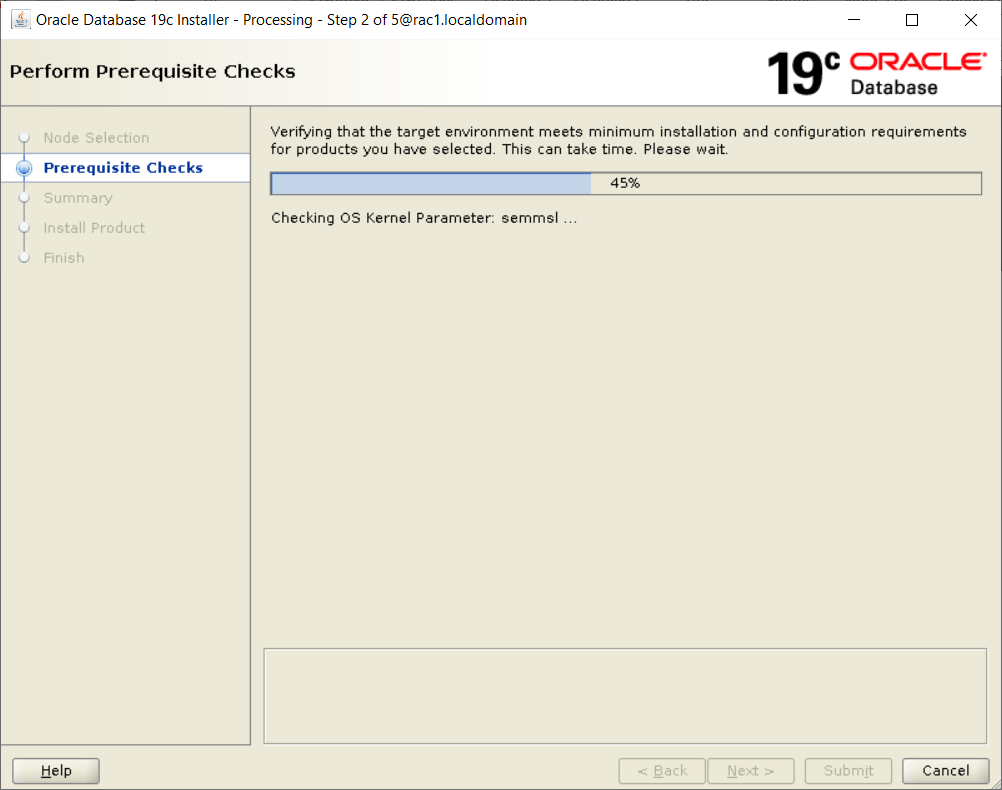
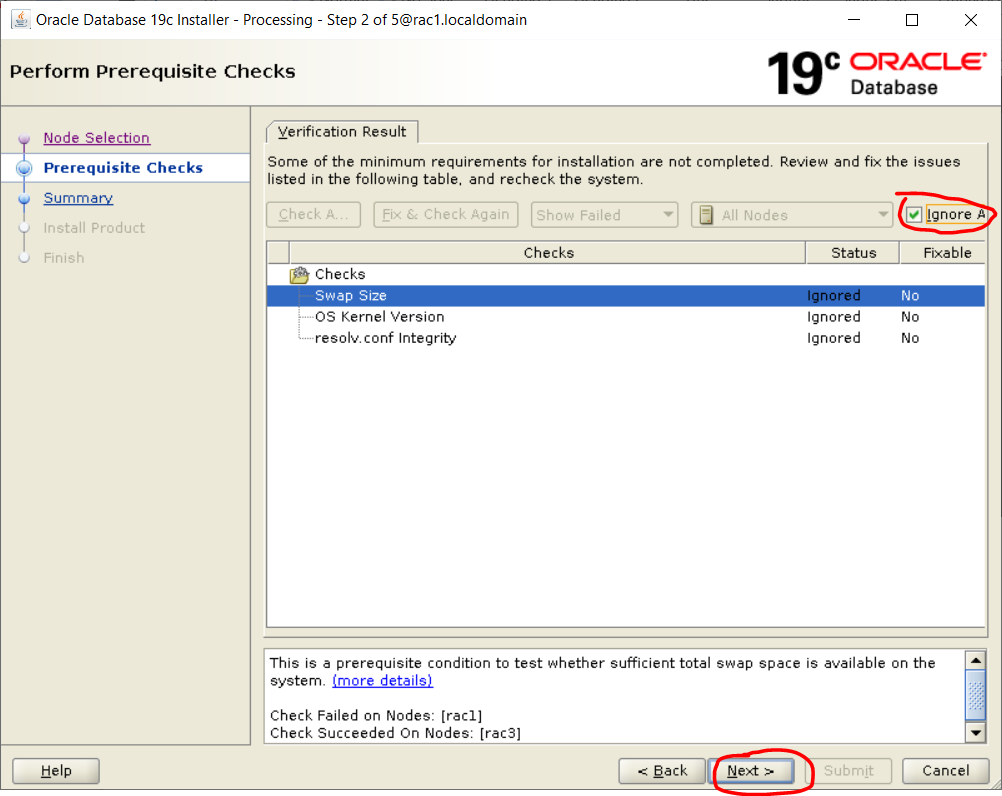
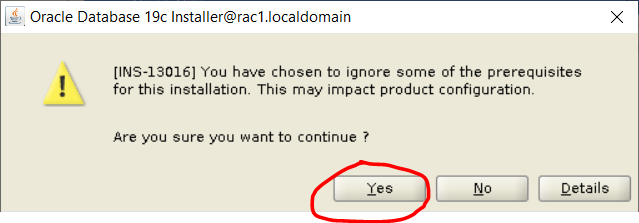
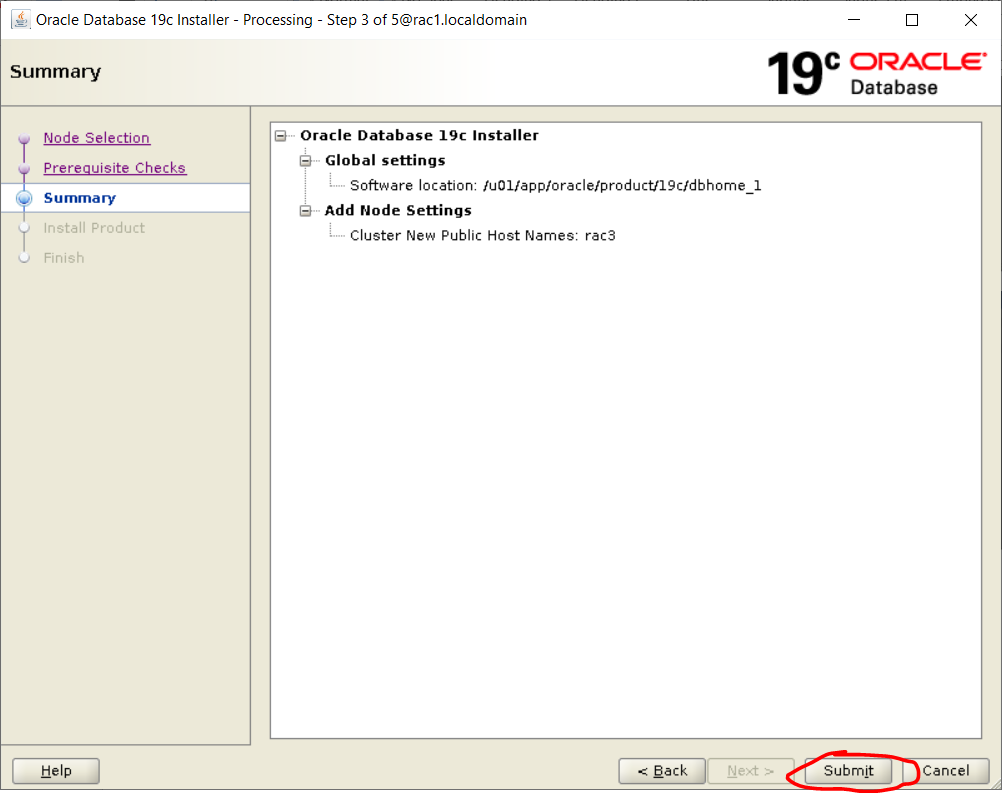

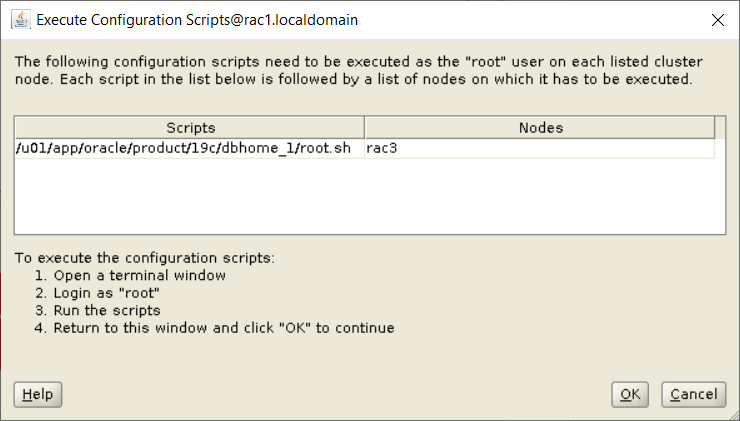
Chạy script root.sh trên rac3
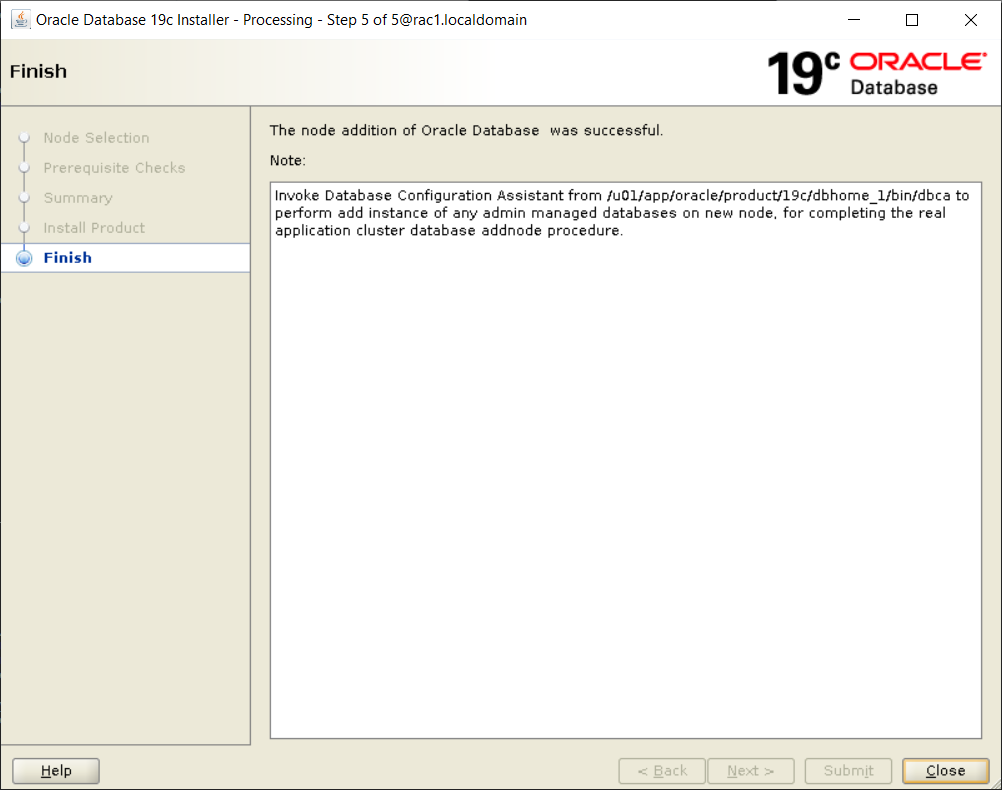
Như vậy là chúng ta đã cài đặt xong oracle_home trên rac3, bây giờ sẽ tiến hành add instance rac3 vào trong cluster
Kiểm tra instance trên cluster hiện tại (vẫn đang có 2 instance là rac1 và rac2, chưa có rac3)
srvctl status database -d oradb

Instance oradb1 is running on node rac1
Instance oradb2 is running on node rac2
Login vào RAC1:
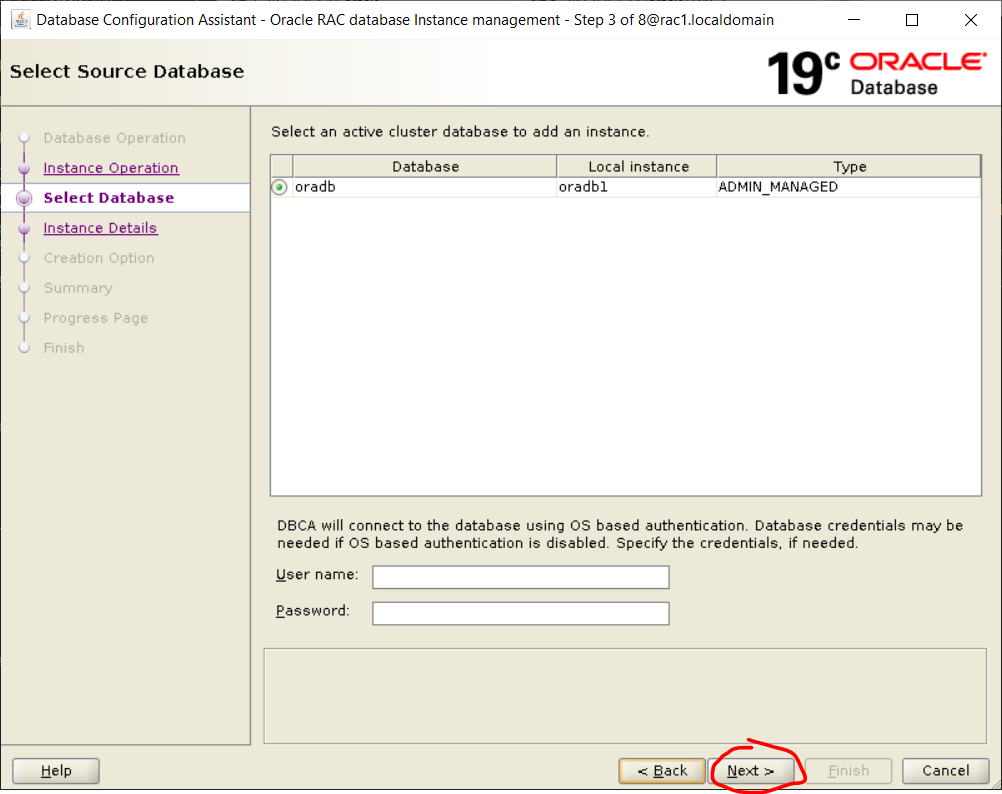
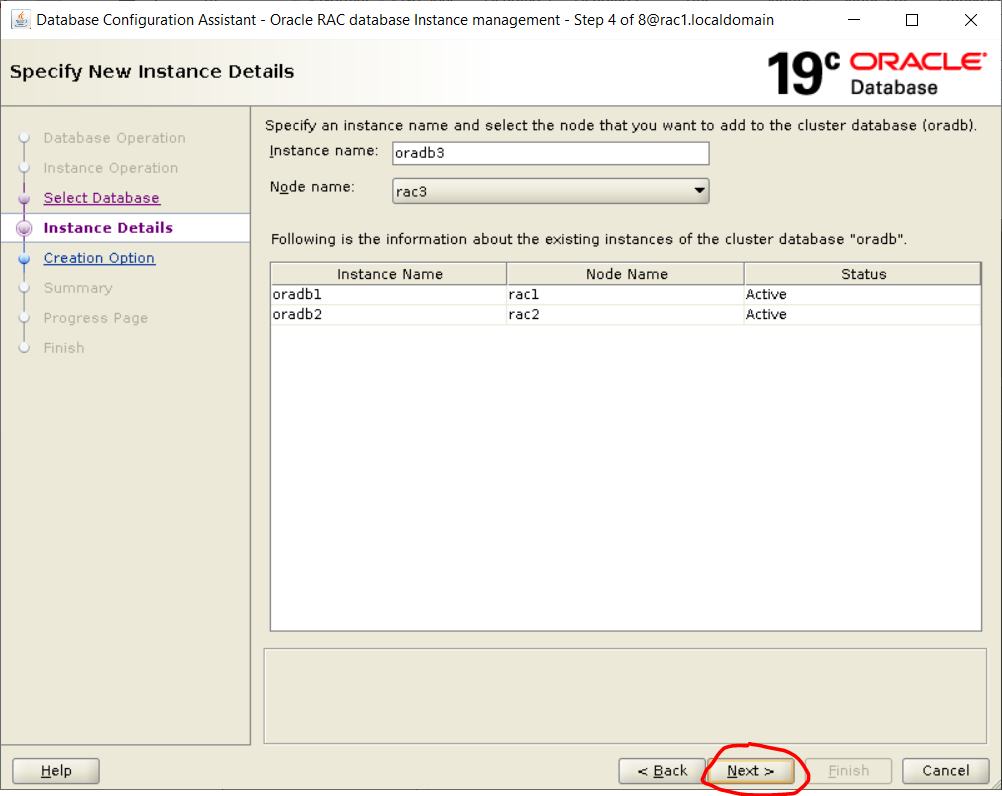
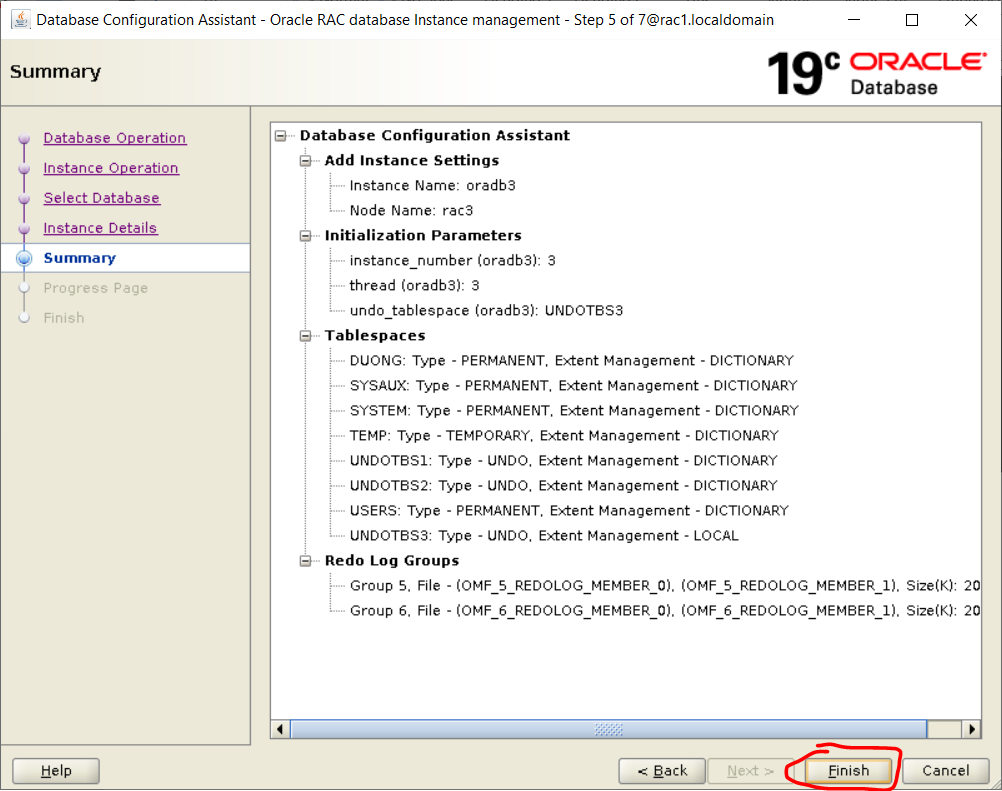
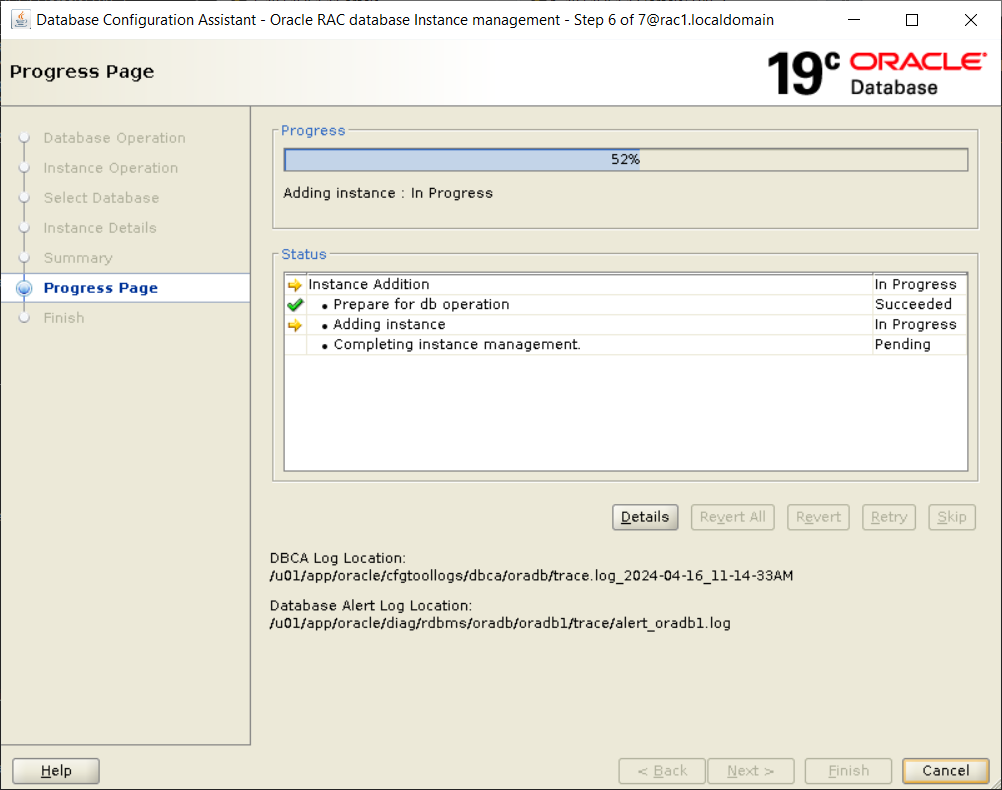
Chạy tiện ích cài đặt DB
dbca
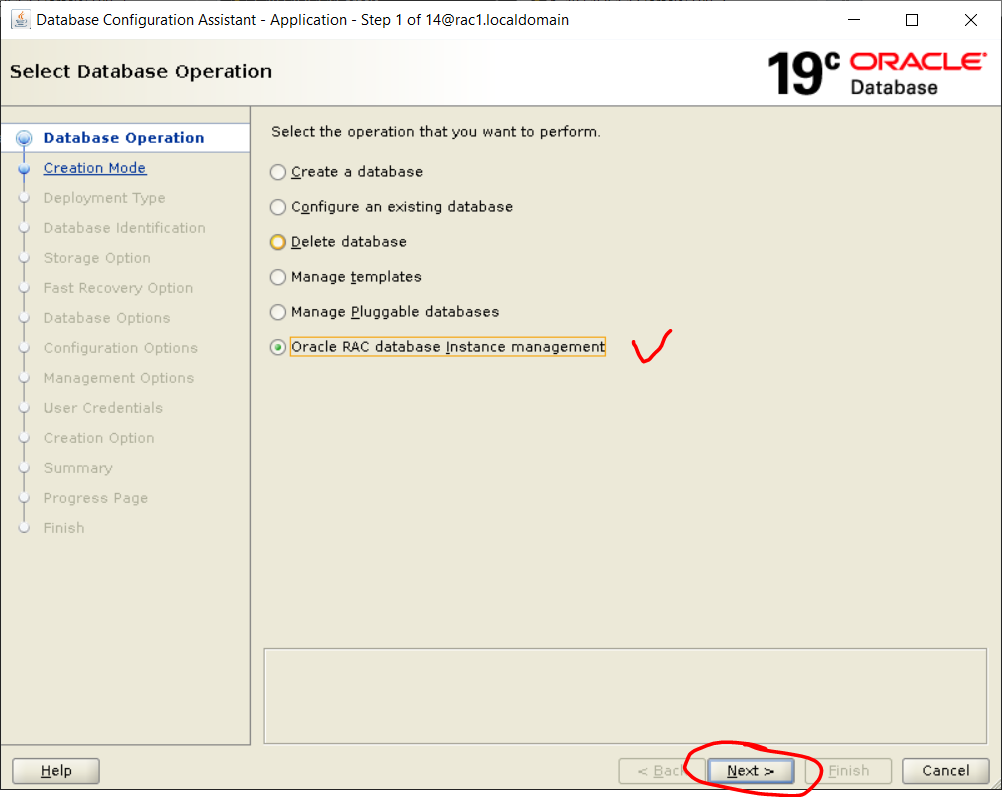

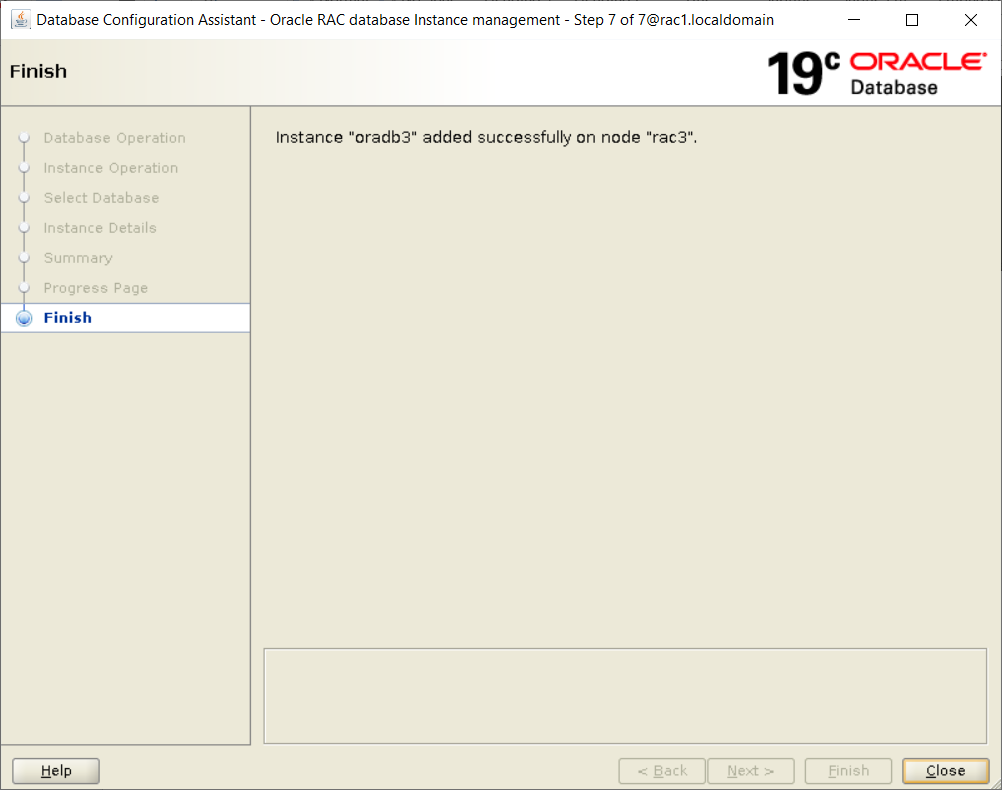
Kiểm tra sau khi add thành công:
srvctl status database -d oradb
srvctl config database -d oradb
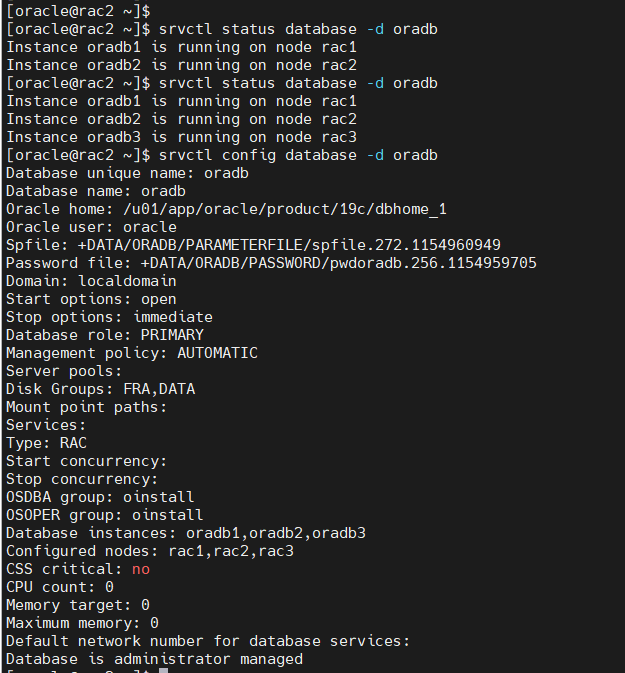
Như vậy là chúng ta đã ADD thành công instance vào cluster => quá trình addnode mới vào cụm RAC thành công!!
Vui lòng để lại lời nhắn nếu bạn cần hỗ trợ!


